Function to Convert Struct Into Class and Back Swift 4.2
Dart is a great language, but it doesn't expose all the functionality you might need for a Flutter app. Your app might have performance-critical code that would benefit from being written in a lower-level language like C, C++ or Rust. Or you might need to link a specific external binary shared library, like TensorFlow or PyTorch Mobile.
Foreign function interface, or FFI, involves code written in one language interfacing with another language. Developers have been able to integrate Dart with native code in beta for some time. However, with Dart v2.13, Dart FFI is now available on the stable channel.
That's great news for Flutter developers! If you're new to FFI, now is the perfect time to explore taking your Flutter app beyond Dart.
In this tutorial, you'll learn how to invoke native code by building WeatherFFI, a Flutter app that generates basic, albeit fake, weather data from a native library.
In the process, you'll learn:
- About FFI and how it lets Dart code invoke code written in other languages.
- How FFI differs from Flutter platform channels.
- To automatically compile and link C code when building a Flutter app.
- How a Flutter app can use FFI to call code written in C.

Before you start, consider what's going on under the hood of a Flutter app.
Under the Hood of a Flutter App
In a Flutter app, Dart code runs alongside the Flutter framework, calculating widget sizes and drawing to the screen at around 60 frames per second:

Your Dart code can use any of the functionality available in the Dart standard library, like opening a file or network connection.

But the Dart standard library only exposes a small amount of the functionality available to devices or operating systems.
For example, you can't use Dart code to work directly with the speakers, camera or microphone. Working directly with these devices requires Java/Kotlin code on Android or Objective-C/Swift code on iOS. For the purposes of this tutorial, call this code platform code.
Sometimes, external plugins or packages let you write Dart code to work indirectly with these devices. These plugins or packages expose a Dart interface that you can use to invoke platform code over platform channels.
Platform Channels and Plugins
Dart code can't interoperate with platform code directly. The Dart compiler can't use the same types, memory layouts, function signatures and other lower-level conventions your platform code uses.
You need a bridge between the two that takes code Dart understands and translates it to code that Java, Kotlin, Swift or Objective-C understand.
The Flutter authors addressed this with plugins and platform channels, which let messages pass between Dart and platform code.

Most Flutter apps that introduce device-specific functionality use platform channels to bridge Dart and platform code.
Native Code
Some apps need greater control over memory management and garbage collection. For example, an app that uses 3D game engines such as Unreal Engine or a machine learning library like Tensorflow needs greater control.

Developers generally write these apps in languages like C, C++ or Rust. For the purpose of this tutorial, call this native code.
For a Flutter app written in Dart to use a library written in native code, your app needs some way to bridge the two, just like Flutter platform channels act as a bridge between Dart code and platform code.
However, you can't use platform channels since they only translate between Dart and platform code such as Java, Kotlin, Swift or Objective-C.
If you want to bridge between Dart code and native code, you need FFI.
Bridging Dart and Native Code with FFI
As mentioned earlier, FFI stands for Foreign Function Interface, a general term for any mechanism that lets developers write code in one programming language to invoke, or bridge, code written in another. It's not just a Dart concept: many languages expose FFI to interoperate with binary libraries.
Developers write many of these binary libraries in C or C++ and distribute them as pre-compiled shared objects.
Flutter apps use dart:ffi library and ffi packages to integrate these libraries by bridging Dart code to native code.
In this tutorial, you'll learn how to do this by writing WeatherFFI, a Flutter app that retrieves some simple weather forecast data from native C code.
This is obviously a contrived example. In the real world, a Flutter app would use FFI for something more like Snapchat's Face Morph, real-time image recognition or video transcoding with FFmpeg.
But this simple example will show the fundamentals behind FFI and give you the tools to move on to more advanced use cases. With theory out of the way, it's time to get started!
Getting Started
Download the starter project by clicking Download Materials at the top or bottom of the tutorial.
Note: This tutorial assumes you have Flutter 2.2 and Dart 2.13 or higher installed. Dart versions prior to v2.12.1 won't work with this tutorial's code.
This tutorial uses VS Code, but all tutorial steps should apply equally to Android Studio.
Android Setup
If you plan on using the Android Emulator or device, follow these steps to ensure Android Studio has both Android Native Development Kit, or NDK, and CMake installed. This applies to macOS, Linux and Windows.
NDK is an add-on to the Android SDK that enables the compilation of native code for Android apps. CMake is a tool that works with Gradle to use a native library.
Once you verify you installed NDK and CMake, you can use either VS Code or Android Studio.
macOS or iOS Setup
If you plan on using the Xcode Simulator or an Apple device, you already have everything you need for this tutorial as long as you followed the official Flutter documentation to install Xcode and configured the Xcode command-line tools.
It's now time to start building your app.
Running WeatherFFI
Open the unzipped folder in your preferred IDE. Either run flutter pub get in the terminal, or open pubspec.yaml and click the Pub get tab that appears in your IDE. Once complete, open lib/main.dart.
Note: Ignore Dart Analysis errors stating Avoid lines longer than 80 characters. These are from lint rules in analysis_options.yaml. The project will still run and the errors will be addressed as you make updates.
Build and run.

You'll see four buttons:
- Temperature retrieves the current numeric temperature.
- Today's forecast retrieves the descriptive forecast for the day.
- 3-day forecast (Fahrenheit) retrieves the 3-day forecast in Fahrenheit.
- 3-day forecast (Celsius) retrieves the 3-day forecast in Celsius.
Right now, these buttons throw an UnimplementedError() exception when tapped. Soon you'll hook each one up to a C function via FFI. Once that's done, you'll know if tomorrow is a raincoat day or a swimsuit day!

Open pubspec.yaml. In the dependencies: section, locate # // TODO: Add ffi package here and replace it with the following, making sure it's indented the same as flutter:
ffi: ^1.0.0 This code lets you use Dart FFI. Now you'll add your first native function.
Your First Native Function
First, you'll create a simple C-sharable object for Dart FFI to access. Then you'll learn to bind and trigger it from a Flutter widget.
Writing A Simple C Function
You need to create a C function before the Temperature button can invoke it.
Navigate to your project's root directory and create a folder called src. Add a file called weather.c which has a single function:

Add the following to weather.c:
double get_temperature() { return 86.0f; } This basic function returns a single double-precision floating-point primitive. WeatherFFI gives you a forecast, but that doesn't mean it's a good forecast! :]
With that in place, it's time to add binding.
Binding: Building A Bridge
Assume your native function compiles to a shared library called libweather.so and correctly links in your Flutter app. Your Flutter app needs to know where to find this function and how to invoke it.
In lib, create a Dart file called ffi_bridge.dart and add:
import 'dart:ffi'; import 'dart:io'; import 'package:ffi/ffi.dart'; typedef TemperatureFunction = Double Function(); typedef TemperatureFunctionDart = double Function(); // TODO: Add new typedef declarations here // TODO: Add ThreeDayForecast here class FFIBridge { TemperatureFunctionDart _getTemperature; // TODO: Add _getForecast declaration here // TODO: Add _getThreeDayForecast here FFIBridge() { // 1 final dl = Platform.isAndroid ? DynamicLibrary.open('libweather.so') : DynamicLibrary.process(); _getTemperature = dl // 2 .lookupFunction< // 3 TemperatureFunction, // 4 TemperatureFunctionDart>('get_temperature'); // TODO: Assign value to _getForecast // TODO: Assign value to _getThreeDayForecast here } // 5 double getTemperature() => _getTemperature(); // TODO: Add getForecast() here // TODO: Add getThreeDayForecast() here } That's a lot of code. Here's a breakdown:
- For Android, you call
DynamicLibraryto find and open the shared librarylibweather.so. You don't need to do this in iOS since all linked symbols map when an app runs. - Then you locate the correct function by specifying its native type signature and name. You use this information to bind to a Dart function with a specific type signature.
-
TemperatureFunctiondefines a native function that accepts no arguments and returns a native C double. - The lookup function is bound to the equivalent Dart function that returns a Dart
double. - Assign
getTemperature()the returned value from the returneddouble.
All the appropriate trampolining, or moving between Dart and native code, and binding, or converting native and Dart types, happens in the background.
Next, you'll see how to trigger this function from Flutter.
Triggering From Flutter
To use your new method, add the following import at the top of main.dart:
import 'ffi_bridge.dart'; Next, find _MyHomePageState and at the top add:
final FFIBridge _ffiBridge = FFIBridge(); Locate // TODO: Add code to invoke newly created temperature method and replace it and the throw line beneath it with:
_show(_ffiBridge.getTemperature()); You've now updated the first button to invoke your newly created method.
Save your changes. Build and run.

Oops, that doesn't look pretty. But don't worry! You'll fix that soon.
Note: While the iOS version gives a similar error screen, the error message is slightly different. The iOS version says "Invalid argument(s): Failed to lookup symbol (dlsym(RTLD_DEFAULT, get_temperature): symbol not found)". This difference is due to how each platform handles dynamic libraries.
You told Dart FFI to look for a particular library function, but that library doesn't exist yet. You haven't compiled weather.c or linked it to your Flutter app, so that's next on your agenda.
Building Native Code
Unlike Dart, native C is platform-specific, so you need to configure the compilers for each platform to handle compiling weather.c. Configuring Android Studio and Xcode for compiling native code is a broad topic beyond this tutorial's scope.
The following two sections will give you enough information to build the shared object used in this example successfully. Thankfully, adding a build step to compile and link C code is painless for both platforms. For more information on building and compiling native Android and iOS apps, please see our Android and iOS tutorials.
Configuring the Android Studio C Compiler
If you followed the tutorial prerequisites, CMake is available as part of the Android NDK. It's the easiest method for compiling native code during Android builds.
Note: If you didn't setup the prerequisites please refer to the Getting Started section.
Open android/app/build.gradle. Locate // TODO: Add externalNativeBuild here and replace it with:
externalNativeBuild { cmake { path "CMakeLists.txt" } } This tells the Android build system to call CMake with CMakeLists.txt when building the app.
Next, still in the android/app directory, create the file named CMakeLists.txt:
cmake_minimum_required(VERSION 3.4.1) add_library( weather SHARED ../../src/weather.c ) If you're not familiar with CMake, this says, "compile weather.c to a shared object library called libweather.so".
In the next section, you'll configure the Xcode C Compiler. Skip this section if you're not using macOS or you're not building the project for an iOS device or simulator.
Configuring the Xcode C Compiler
In your IDE's terminal window, run flutter build ios. You'll receive confirmation the build was successful and return to the prompt.
Open Xcode and open your starter project's ios/Runner.xcworkspace.
Using the following screenshot as reference, make the following updates:

Here's a step-by-step breakdown:
- Select Runner under the left-most icon in the top-left bar.
- Under Targets select Runner.
- On the row of tabs, select Build Phases.
- Expand Compile Sources tab and click the +.

Next:
- On the popup window, click Add Other…

Finally:
- Navigate to your project's src folder and select weather.c.
- Click Open.
Return to your Flutter IDE.
Build and run. Then tap Temperature and you'll see a popup message showing the temperature:

Great job! You successfully:
- Wrote a C function.
- Compiled this function into a shared object and linked it into your Flutter app.
- Used FFI to locate the library and function signature.
- Bound the native function to a Dart function.
- Invoked the Dart function to return a double from the C function.
You also know that it's a beautiful 86°F, or 30°C, degrees outside. What a lovely day!
Now it's time to bind a function that returns a pointer.
Binding Functions That Return Pointers
The double your C function returns is a stack-allocated primitive that freely passes between C and Dart code without any memory concerns.
What if you want to obtain a Dart String from your C function? The C standard library has no concept of a string, so you can only work with NULL-terminated char array pointers.
Note: If you need a refresher on scope and memory allocation in C, you might want to read these lecture slides.
Proper Scope
You might feel tempted to add the following to weather.c, but don't:
char* get_forecast() { char* forecast = "sunny"; return forecast; } This code will compile unless you've turned on the right compiler warnings, but it isn't valid C!
Why? Because you created a stack-allocated char array, which is only valid within the scope of this function. Once you return the pointer to your Dart code, this no longer points to a valid char array in memory.
To safely return a char pointer, you must return a pointer to properly allocated memory.
Add the following code to weather.c:
char* get_forecast() { char* forecast = "sunny"; char* forecast_m = malloc(strlen(forecast)); strcpy(forecast_m, forecast); return forecast_m; } This function creates a local char pointer for the string "sunny", allocates memory for a char pointer memory on the heap of the same size, and copies the contents of the former into the latter.
Then add the following C library includes to the top of weather.c:
#include <string.h> #include <stddef.h> #include <stdbool.h> #include <stdlib.h> This code includes header files from the C standard library so that you can use strcpy, strlen and a few other functions and types you'll see later in this tutorial.
Note: In general, you should avoid strcpy and strlen because you can inadvertently introduce security holes by copying untrusted data.
In this tutorial, you know exactly what memory you're copying, so there's no need to worry.
If you're a seasoned C developer, you already know that returning pointers to locally-scoped variables is a big no-no. At best, it'll create incorrect return values. At worst, your app will segfault and crash.
If this is your first time working with C, it's worth reiterating: don't return pointers to locally-scoped variables!
Next, you need to create a Dart type to represent a function that accepts no arguments with a return value of type Pointer.
Typing Dart Functions That Return Pointers
On the Dart side, create the matching typedefs in ffi_bridge.dart. Locate // TODO: Add new typedef declarations here and replace it with:
typedef ForecastFunction = Pointer<Utf8> Function(); typedef ForecastFunctionDart = Pointer<Utf8> Function(); Dart FFI uses Pointer<Utf8> to represent a char pointer. Keep in mind, the Dart typedef doesn't return a String because you need to manually free the returned pointer. In contrast, TemperatureFunction directly returns a Dart double.
Add Functions and Their Respective Lookups
Find and replace // TODO: Add _getForecast declaration here with:
ForecastFunctionDart _getForecast; Here you added a _getForecast of type ForecastFunctionDart to your FFIBridge, which is the Dart function that acts as a bridge to a C function.
Next, replace // TODO: Assign value to _getForecast with:
_getForecast = dl .lookupFunction<ForecastFunction, ForecastFunctionDart>('get_forecast'); This uses DynamicLibrary to locate the C function you'll bridge to, using the name get_forecast and the typedef ForecastFunction.
Find // TODO: Add getForecast() here and replace it with:
String getForecast() { final ptr = _getForecast(); final forecast = ptr.toDartString(); calloc.free(ptr); return forecast; } In this code, you create a getForecast that invokes the bound Dart function, converts the returned char pointer to a Dart string and frees the memory allocated for the returned pointer.
Return to main.dart and locate // TODO: Add code to invoke newly created forecast method replace it and throw UnimplementedError(); with:
_show(_ffiBridge.getForecast());
This invokes the getForecast() you added in the last step.
Build and run. Then click Today's forecast.

Voila! Here you:
- Obtain a native
charpointer. - Convert the pointer to a UTF8/Dart
String. - Free the allocated memory.
- Pass the String back to your Flutter widget.
Both the get_temperature and get_forecast returned primitive types, a double, and a char pointer respectively. Neither of these functions accepted any arguments.
Next, you'll see how to invoke a C function that accepts some arguments. You'll also see how to return a more complicated data structure, not just a simple pointer.
Arguments and Structs
In this section, you'll see how to pass arguments from Dart to C by creating a function to return a three-day forecast in either Celsius or Fahrenheit.
Creating A Three-Day Forecast Structure
A three-day forecast needs three temperature values, so you obviously can't return a solitary double. You need to create an appropriate struct.
Add the following to the bottom of weather.c:
struct ThreeDayForecast { double today; double tomorrow; double day_after; }; Then add a function that converts between Fahrenheit and Celsius:
double fahrenheit_to_celsius(double temperature) { return (5.0f / 9.0f) * (temperature - 32); } In the next section, you'll write the function to create an instance of the ThreeDayForecast struct. This function will then populate the struct's values with the temperature forecast in either Celsius or Fahrenheit.
Accepting Arguments And Returning Structs
Before your app can provide a three-day forecast in both Fahrenheit and Celsius, you need to create a function that accepts arguments.
At the bottom of weather.c, add:
// 1 struct ThreeDayForecast get_three_day_forecast(bool useCelsius) { // 2 struct ThreeDayForecast forecast; forecast.today = 87.0f; forecast.tomorrow = 88.0f; forecast.day_after = 89.0f; // 3 if(useCelsius) { forecast.today = fahrenheit_to_celsius(forecast.today); forecast.tomorrow = fahrenheit_to_celsius(forecast.tomorrow); forecast.day_after = fahrenheit_to_celsius(forecast.day_after); } // 4 return forecast; } Going through step-by-step, this function:
- Accepts a
boolindicating whether to return Celsius or Fahrenheit values. - Instantiates a struct with some very boring and static values, representing the forecasted temperature over the next three days.
- Converts these values to Celsius if
useCelsiusis true. - Returns the struct.
Since this function returns a struct, you can't use the same approach as getForecast() and return a Pointer. You need to create a matching class on the Dart side to receive the values in this struct.
Receiving a Struct in Dart
Receiving a struct data type means you need to create a Dart class that mimics the layout and naming of this struct, allowing Dart FFI to easily bridge between the native C type and the Dart type.
In ffi_bridge.dart, locate // TODO: Add ThreeDayForecast here and replace it with:
class ThreeDayForecast extends Struct { // 1 @Double() external double get today; external set today(double value); @Double() external double get tomorrow; external set tomorrow(double value); @Double() external double get day_after; external set day_after(double value); // 2 @override String toString() { return 'Today : ${today.toStringAsFixed(1)}\n' 'Tomorrow : ${tomorrow.toStringAsFixed(1)}\n' 'Day After ${day_after.toStringAsFixed(1)}'; } } // 3 typedef ThreeDayForecastFunction = ThreeDayForecast Function(Uint8 useCelsius); typedef ThreeDayForecastFunctionDart = ThreeDayForecast Function( int useCelsius); Here:
- The
Double()annotation indicates the native type of each field to Dart FFI. - You return the forecast listed to one decimal point.
- The
typedefindicates the method will have a return type of this class and expects a singleint(Dart) /Uint8C argument. There's no matching FFI Boolean type, so you use an unsigned 8-bit integer instead.
Note: It's important to note that get_three_day_forecast returns the ThreeDayForecast struct by value, not by reference. To review the difference between pass-by-value and pass-by-reference, check out this article.
You created a Dart class that can receive the values in the C ThreeDayForecast struct. Now, you can add the code needed to invoke the get_three_day_forecast function.
Binding the Native Struct to a Dart Class
The last feature you'll add is getting the three-day forecast.
Still in ffi_bridge.dart, locate and replace // TODO: Add _getThreeDayForecast here with:
ThreeDayForecastFunctionDart _getThreeDayForecast; Here you added a _getThreeDayForecast property to your FFIBridge class, representing the Dart function that will bridge to a C function.
Find // TODO: Assign value to _getThreeDayForecast here and replace it with:
_getThreeDayForecast = dl.lookupFunction<ThreeDayForecastFunction, ThreeDayForecastFunctionDart>('get_three_day_forecast'); This uses DynamicLibrary to look up the C function by name get_three_day_forecast with the arguments and return type specified by the ThreeDayForecastFunction typedef.
Fially, you need to return the three-day forecast. You guessed it, replace // TODO: Add getThreeDayForecast() here with:
ThreeDayForecast getThreeDayForecast(bool useCelsius) { return _getThreeDayForecast(useCelsius ? 1 : 0); } In this code, you added a getThreeDayForecast method to call this function and return an instance of the Dart class ThreeDayForecast that contains the result.
Finally, in main.dart change // TODO: Add code to invoke newly created 3-day forecast (Fahrenheit) method and the throw to call this method when the user presses the relevant button:
_show(_ffiBridge.getThreeDayForecast(false)); Do the same for // TODO: Add code to invoke newly created 3-day forecast (Celsius) and throw:
_show(_ffiBridge.getThreeDayForecast(true)); This last update removed the last error shown on the Dart Analysis tab. :]
Build and run. Tap 3-day forecast (Fahrenheit):

Tap anywhere on the barrier to dismiss the dialog. Then tap 3-day forecast (Celsius):
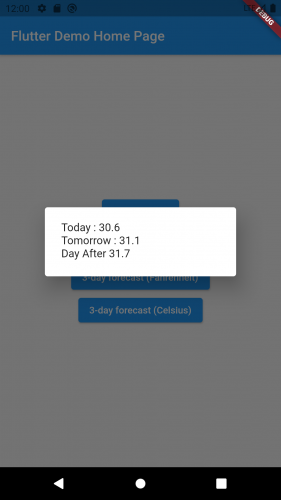
Looking good! You passed a bool argument to, and returned a struct from, your native function.
With that, WeatherFFI is complete! It looks like you'll need some lotion and sunglasses for the next few days.
![]()
Admittedly, the forecast will never change, so don't rely on it if you're deciding whether to take an umbrella tomorrow.
But in terms of learning how to call native code directly from Dart, it's a resounding success. You now know how to compile, declare, locate and invoke a native function from within a Flutter app on both iOS and Android.
Now that you understand how to use Dart FFI to invoke native code, take a look at when you might want to use FFI and when you might want to use platform channels.
Platform Channels vs Dart FFI
You've already seen a few use cases for platform channels compared with FFI.
In general, use platform channels for device or OS-specific functionality like cameras, notifications and integrations with other apps. Android, iOS, desktop and web apps all expose different APIs for taking advantage of that functionality.
Use FFI if you're writing a Flutter app that needs third-party, platform-agnostic libraries. Examples include machine learning libraries, rendering engines, cryptography and signal processing.
While it's technically possible to use FFI for your own standalone native code, it's more likely you'll need FFI to integrate libraries like OpenCV, Tensorflow or PyTorch into your Flutter app.
Note: Dart FFI currently isn't available for Flutter Web apps. It isn't marked as stable for Flutter Windows apps yet.
Where to Go From Here?
Download the completed project files by clicking Download Materials at the top or bottom of the tutorial.
To avoid tedious boilerplate typedef code, check out the official ffigen repository, or browse some more FFI samples at the official Dart ffi repository. If you're interested in understanding FFI in a bit more detail, read the official Flutter documentation on implementing Dart FFI.
If you want to use FFI to bind to a game engine, check out How to Create a 2D Snake Game in Flutter for some ideas about where to draw the line between your Flutter code and your native library.
FFI can be tricky, so please join the forum discussion below if you have any questions or run into any issues. In the meantime, you also might want to check the actual weather report for your area to minimize the risk of wearing Hawaiian shirts when it's sub-zero and snowing!
raywenderlich.com Weekly
The raywenderlich.com newsletter is the easiest way to stay up-to-date on everything you need to know as a mobile developer.
Get a weekly digest of our tutorials and courses, and receive a free in-depth email course as a bonus!
Function to Convert Struct Into Class and Back Swift 4.2
Source: https://www.raywenderlich.com/21512310-calling-native-libraries-in-flutter-with-dart-ffi
0 Response to "Function to Convert Struct Into Class and Back Swift 4.2"
Post a Comment